default

2014-11-30 All Electronics TOR-74 And FB-102

I bought some cat# TOR-74 from All Electronics for 4 for $1.00.  They say these toroid cores are Magnetics ZF410057C, but Google didn’t turn up any data on them.  They are coated Grey, and are 9.5mm O.D., 4.5mm I.D., and 5.0mm high, or .375 inch O.D., .178 inch I.D., and .197 inch high. This is a nice, small size for a compact Joule Thief.

I wound one with 10 turns of 24 AWG plastic insulated telephone wire, which fits easily on this core.  It measured 219.6 microhenrys, which is a very good value for a Joule Thief, or the 220 uH could be as low as 100 uH with fewer turns.

For a Joule Thief, it will need a second feedback winding. This can be thin wire such as 30 AWG or 0.25mm. My “standard Joule Thief coil” used four lengths of 30 AWG quadrifilar wound, with three of the windings connected in parallel for the primary. I could wind about 10 to 12 turns or about 7 inches. But the core I used was a little bit bigger. I tried four 7 inch lengths of 30 AWG wires on this TOR-74 core and I got to 10 turns before the wire got short. There was still enough space in the hole to put several more turns. This second core of 10 turns measured 216 microhenrys, nearly the same as the first core.

For a Joule Thief, three things make this a good choice: The small size. inexpensive cost, and high permeability meaning high inductance with few turns.

FB-102

I also bought some FB-102 toroids, or ferrite beads as they call them, for $ each. These are supposed to be uncoated ferrite, but the package is rusty brown from the dust from the beads. I think that it’s possible that the material is actually powdered iron. They are more cylindrical than a toroid, more like 2 toroids stacked one on top of the other. I assume that’s why they called them ferrite beads.

I wound ten turns of 24 AWG insulated telephone wire on one and measured the inductance at 57 uH. I continued winding more turns until I got to 14, which measured 110 uH. This means the permeability is less than the TOR-74, I’m guesstimating somewhere around 1000. This also adds to my suspicion that they may be powdered iron. I also wound 14 turns of 28 AWG enameled wire over the 24 AWG, for the feedback winding. This should make a good Joule Thief coil, but I haven’t tried it yet.

Have fun making your Joule Thief, and Happy Holidays.

default

2014-12-06 Geiger Counter Assembled Kit

Along with the Sonalerts, I bought an assembled kit for a Geiger counter from Goldmine for $70.00.  I didn’t know that it was a kit, but I would’ve bought it even if I did know.  It comes ready to connect to a 9 volt battery, which I did as soon as I read the directions.

This GC doesn’t seem very sensitive.  My assumption was that the background count would be about 10 per minute.  As it is, this GC only puts out a few clicks a minute – 2, 3, or 4 at most.  Sometimes it seems less than 2. The Geiger tube is very small; only about the size of two NE-2 neon lamps end-to-end, which looks like about half the length of a typical Geiger tube. If the size of a Geiger tube is small, it would seem to me that fewer radiation particles would hit it, and this might be the reason for its lower sensitivity. A tube half as long, half as wide and half as high would have 1/2 cubed, or 1/8 as much volume, and hence 1/8 as many particles would hit it.

I have to do a few tests on it.  I have to find a source of radiation.  I tried some lenses from old cameras, but got no increase in radiation.  I have a few more old cameras I have to try – some lenses have radioactive thoriated glass.  Then I’ll see if I can get a smoke alarm to increase the click rate.

Once I get a higher click rate, I will measure the battery current, which I assume is greater at high click rates.  If the current is reasonable, I may put one of my DC-DC converters on it.  9 volt batteries are too expensive to use up constantly (however I found that monoprice.com offers a pack of two 9 volt alkalines for under $2.00 – less than half the price in stores).  Even better, I can run the converter with Ni-MH rechargeable AA cells for a whole lot cheaper.

I also got the book, Contesting The Future Of Nuclear Power by Sovacool.  I have yet to read it.  First off, I’m not against nuclear power.  What I have read online is that in the United States, the future of nuclear power looks very dim because of the high cost of building nuclear power plants, the high cost of maintaining them, and the high cost of nuclear fuel, just to name a few reasons.  This also includes the apathy toward the acceptance of new nuclear power plants due to the major accidents around the world.  More on this later.

default

2014-12-03 Battery Recovery Or Rebound

I culled through a bunch of AA and AAA cells to find any that were dying or nearly dead.  If I found any that were below 1.2 volts they were considered dying, and below 1 volt, they were considered dead. 

I then put some of the dead ones into Joule Thiefs to suck out the last few milliJoules of energy left.  Since these cells were so low voltage, I used Joule Thiefs having a germanium transistor, so that the Joule Thief’s LED would still be lit when the cell’s voltage is well below half volt, which is typically where silicon transistors quit.

Germanium transistors typically have lower current gain than silicon; usually less than 100, which is half to 1/4 of silicon, which is typically 200 to 400. The standard silicon JT circuit uses a 1000 ohm resistor for silicon transistors with gains of around 300. For germanium, the resistor should therefore be lower, 470, 330 or possibly less.

The Joule Thief I used had a 330 ohm resistor. At less than 1 volt the LED was bright. Over a period of a few days the led grew dimmer and dimmer and finally went out. So I took the cell out and put in another “dead” cell. After an hour or so, I checked the voltage of the first cell and it had climbed from less than 0.25 volts up to more than a half volt. The cell had recovered or rebounded back to where it could run the Joule Thief. I removed the second cell and put the first cell back in. The JT lit up for about a half minute, and then dimmed down to nothing.

I have done this before with nearly depleted batteries, and usually I can repeat this recovery and depletion a few times before the cell finally dies. I think what’s happening is the chemicals in the cell get used up until the small amount of chemicals left can only power a light load. Even a low power JT becomes too heavy of a load for the cell. The cell’s internal resistance goes up and the JT dims out. Then after recovery, the internal resistance drops enough to light the JT for a short period.

I thought that if my theory is correct then if I reduce the JT’s running current, the cell will not dim and recover, but instead keep the JT lit longer with less or no dimming and recovery. This is easy to do; just increase the resistance of the base resistor. The JT will then run at a lower current. The existing resistor was 330 ohms; I added a second 1k, 1/8 watt resistor in series for a total of 1.33k. The germanium JT ran fine with this much resistance, and the LED was bright with the cell voltage of less than 1/3 volt. I could have put a very small trimpot in place of the 1k resistor – a 2.5k or 5k might be a good choice. Or a small switch across the 1k to jumper it and go back to 330 ohms.

I think this topic needs further experimentation, but that can wait for another blog.

default

2014-12-04 RF Interference From DC-DC Converter

I’ve been using these DC-DC converters for charging cell phones in my car and in the house (more in this blog) and they work fine.  But when I plug my phone in, my FM radio station gets a lot of RF interference.  I admit that the station, KSBR, which is low power and far away, has a weak signal, and that makes the problem worse.  If the station was a powerful commercial station, the problem would probably be less, or not a problem if I moved the charger a few feet away from the radio.

But I like playing, er, experimenting with ferrite toroids and the like, so I decided to try putting RF interference suppressors on the cables.  Most of us have seen the big plastic cylindrical thing on cables next to the connectors.  This is a cylinder of ferrite.  It’s like putting 4 or 5 toroids next to each other on the cable.  These are effective at choking off and absorbing the RF interference coming out of the equipment by way of the cable.

I found some reasonably priced snap-on RFI suppressors at All Electronics. At $0.75 each, I can get a dozen for about ten dollars US and snap them on to both ends of the cables. I have already put the small ends of cables through a larger toroid, and it helped some. But I still hear some interference when it’s charging. So I ordered one size for larger cables and one for smaller cables. I guess they will arrive early next week.

default

2014-12-01 My New PC Arrived.

I haven’t opened it yet.  It’s a Dell XPS tower with 16G RAM, 1T HDD, Core i7, 4G Nvidia video card.  It was on sale through Costco online only.

I forgot to order a monitor, but instead I’m going to get a 32″ TV with HDMI inputs. 

I ordered some longer HDMI cables from Monoprice.com. They have all kinds of cables, especially cat5e and cat6 datacomm cables for very reasonable prices.

I bought a Samsung 840 EVO 256 GB SSD online for $120, not including S&H. SSDs are getting really cheap: 128G for $60 US. Before I put it into the XPS, I absolutely must do a complete backup of the HDD, the whole thing and separate partitions. I tried to backup Win 8 awhile ago, but Ghost doesn’t recognize most of the HDD. I need a newer version or something else such as Clonezilla, or Acronis. Someone told me that Acronis is better than Ghost, but I haven’t used it, and neither have my friends. I might try Clonezilla since it’s open source (free).

default

2014-11-22 Ultrasonic Dog Repeller

A few weeks ago I ordered an ultrasonic dog repeller from an Asian dealer and it finally arrived this week.  It wasn’t very expensive. I think one reason why is because this product has never been scientifically tested to prove that it works. The reason I say this is that this product apparently is not sold (legally) in the U.S. because it is considered to be ineffective.

I bought a cheap 9 volt super heavy duty battery at the dollar store and put it in the repeller.  I aimed it at a female chihuahua, and pressed the button.  It got her attention immediately.  But not what I had expected.  She looked at it and her ears pointed at it, and she turned her head from side to side, but didn’t make much of a fuss, and she didn’t turn and run.  It looked like my first attempt at repelling a dog ended in failure. 

I bought a squeaky toy, mainly because I plan on putting a Blue Blinky inside of it (later blog). It’s a green octopus made from translucent plastic. I had to remove the squeaker to make room for the battery and circuit. I tried the squeaker on the two dogs (above) and got much better results than with the ultrasonic dog repeller. They hear the loud squeeeeek! and they’re running away! They don’t like it at all! :-))

default

2014-11-06 Other Useful Things From DX.com

I saw a few items at DX.com that look like they could be very useful.

A USB power meter, with even more information in the display, compared to the somewhat lame Practical Power meter.

You won’t be caught with a dying cell phone battery with this.  It’s a useful addition to your flashlight collection.  This has a battery holder for a 18650 Lithium battery, and converts the battery to 5V at up to 1 amp, out to a USB jack.  You can plug your cell phone cable into this, or use it as a flashlight with the LED ‘head’ that comes with the adapter.

A HDMI switch, which seems to be the trend nowadays with HDMI everywhere.

default

2014-11-05 Flashlight & Warm White Strawhat LEDs

I’ve thought about putting a series string of LED lamps into a Moebius Loop to make a free energy generator.  No telling if the thing will work.  😉

The LEDs

I bought a box of 100 Sencart LEDS from dealextreme.com more than a month ago and they finally arrived this week.  The cost was under $5 USD, with free shipping.  These were commonly called strawhat because of the shape of the package.  The LED chip is very close to the surface of the lens, so the light beam is unfocused and the light spreads out very evenly over nearly 180 degrees.  The light is a warm white, 3000 to 3500 K, very close to an incandescent bulb.  I tried one in a Joule Thief, and I’m happy with the results.

One thing that concerns me is the quality and cost. I’ve purchased inexpensive white LEDs before from sources in Asia and I’ve been disappointed with the results. Typically the white LEDs quickly lose brightness and go dim in less than 1500 hours. In one blog (now gone) I showed four ‘used’ LEDs and one new LED, all identical, shining on a wall. The single LED was much brighter than the four used LEDs. They were all in series, so the current was identical in all five. The old adage “caveat emptor” applies here.

The Hand Cranked Flashlight

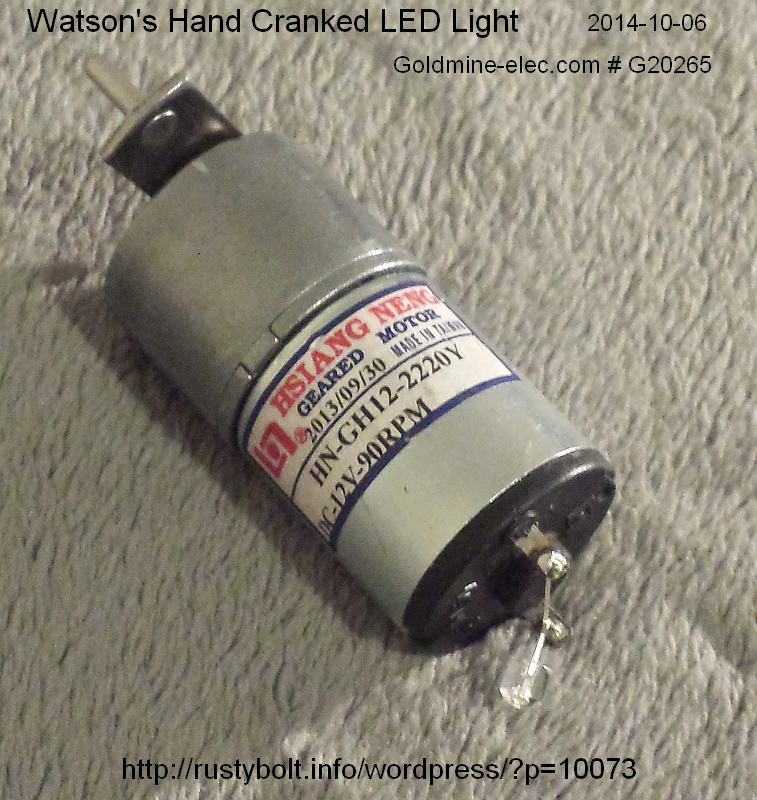
IMG_20141106_181103S5So now that I have  a hundred of these LEDs, what do I do with them?  Well, here’s one use for these LEDs.  I bought several of these motors with gears and a crank on the end from goldmine-elec.com for $8.95 apiece, or about ten dollars with shipping.  The crank allows one to turn the shaft by hand and the gears speed up the motor revolutions so that the LED soldered directly across the two terminals puts out a decent amount of light while cranking about 40 turns per minute.  It’s easy to do, but the crank is small diameter and my fingers got sore after a few minutes of cranking.  This can be fixed by putting some heat shrink tubing over the crank shaft, or soldering 6 or so washers to the crank shaft to make it larger diameter. I measured the shaft at 0.125 inch or 3.1 mm diameter.

Of course the motor and crank can still be used for its original purpose, as a motor.  The crank can be attached to something that moves, and a power source such as a solar panel can be used to run it. The ad says it will run at 3 volts, so a low voltage source such as a battery could be used. I would put a microphone on an amplifier to make the crank move something when there’s a loud sound.  Or the crank could be used to point the solar panel to pick up the most sunlight.  I wonder what their original use was?  Perhaps in a VHS tape player to pull the cassette in and out?  I hope they go on sale; for a hand cranked flashlight, ten dollars is a bit expensive.

I added a second warm white LED to the first one; it puts out more light as I expected, but it’s harder to crank. I’m going to try one with the head of a 9 LED flashlight, to see if it does as good a job as three AAA cells.  It might be too much to crank.

Instead, I used the head of a 3 LED flashlight. It puts out a decent amount of light, but it’s a sickly blue-white, like there is not enough phosphor to cover the LED chip, with the blue light leaking through.

I also connected two warm white LEDs in series. It’s easier to crank but probably puts out less light than 2 in parallel.

Update Nov 10 – I have a cheap “desk light” – actually more of a toy due to the battery compartment in the base; it does have an AC adapter, though. The 12 LEDs in it were dim and “used up” and put out a small fraction of the light when it was new. I unscrewed the head and replaced the old ones with the warm white LEDs. Now it’s much, much brighter and makes a decent reading light.

I ordered more of the motors, but they emailed that the motors had all been sold so that they could only partially fill my order. I guess the early birds got all the worms. 😉

I also got some switch assortments. The types of switches may vary with each assortment pack. These were all C & K switches, very high quality. Most were in good condition, with a few missing a part, but still usable. There were several SPDT pushbutton switches, which are especially good for certain timer circuits. Some were for mounting on a circuit board.

default

2014-11-02 Unique Limited Power Joule Thief

I built this special Joule Thief a while ago, and I don’t remember if I wrote a blog about it.

To enlarge, click more than once.

To enlarge, click more than once.

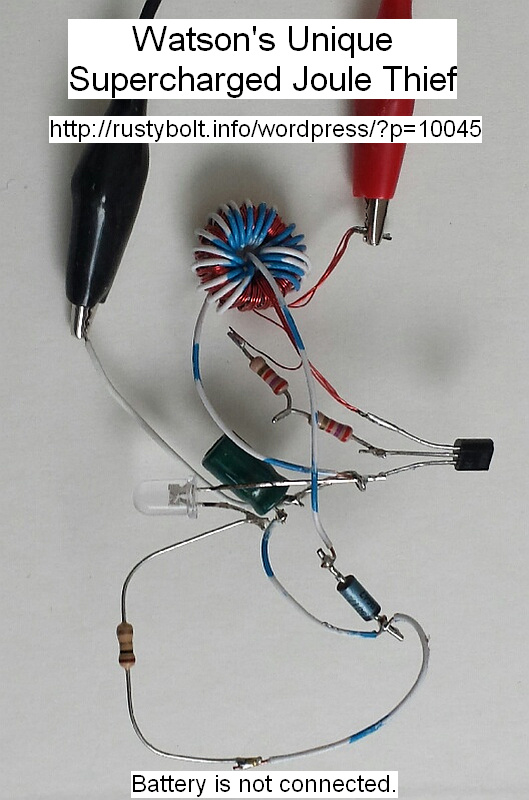
I wound the two normal windings on the toroid core, then I wound a third winding of 20 turns for driving the LED. But instead of driving the LED directly from the transistor, I connected one of the 3rd winding leads to negative and the other lead to the anode of a 1N5817 Schottky diode. I connected the cathode of this diode to the positive of a 100 uF ‘lytic capacitor and connected its negative to the battery negative. In other words, the pulses from this winding are being rectified and filtered to DC. One important thing to remember is that this winding may give higher LED current when connected in one direction, so it’s best to try both directions and use the one with the highest LED current (see note).

This DC is then connected directly to the LED. A 1 ohm resistor is between the LED cathode and the negative to allow the LED current to be measured: 1 millivolt equals 1 milliamp.

The rest of the circuit is a conventional JT, but instead of a 1k resistor, I used two 27k resistors in series, totaling 54k. The transistor was a BC337-25. It used a standard 5mm white LED.

The battery current measured about 23 mA, but when I put a short across the meter leads, I could see the LED get brighter, so I estimate the actual battery current is more like 27 mA. The meter read 8 millivolts across the 1 ohm resistor, so there are 8 milliamps through the LED. I calculated an efficiency of about 64 percent, which is a reasonable value for a Joule Thief.

Note: Some experimenters try to solve this by using a diode bridge rectifier. but the bridge has two diode drops totaling 1.2 to 1.6 volts, which is up to half the power sent to the LED being wasted in the diodes as heat. Obviously this is not a good idea. Less diodes is best. Also using a Schottky diode with low voltage drop wastes less power.

default

2014-10-30 Low Power Supercharged Joule Thief

One might think that there is not much point in trying to get more light out of a single battery when the light output is very low and the cell is going to run for weeks. But the Supercharged Joule Thief has proved to be much more efficient and is capable of doubling the the light output for the same battery current, or doubling the run time with the same light output (see note at end).
IMG_20141105_112704S3

I modified a Supercharged Joule Thief PC  board I designed few years ago to reduce the current from the battery and to the LED, in order to maximize the battery life.  My original circuit (see note at end) used a 1.5k resistor and a capacitor of between 560 and 1000 pF.  The coil was a 1/4 inch (6mm) O.D. high permeability toroid core with windings of about 7 inches (177mm) of 30 AWG (.25mm) enameled magnet wire.  The transistor was a BC337-25.  The LED was a blue 5mm. A typical choice for a battery is a 1.5 volt AA cell.

I used all of these same components except I changed the resistor to 51k and the capacitor to 127 pF.  I actually used a 100k pot and a 500 pF variable capacitor to adjust the values.  The pot was set to about 50k and the LED current was about 5 mA. I adjusted the variable capacitor to about 125 pF and the current came to a very broad peak. At this low current the LED is not very bright so I measured the voltage across the 1 ohm resistor in series with the LED. The frequency was about 165 kHz.

Note: The original Supercharged Joule Thief schematic.
The Combined schematic of conventional and Supercharged Joule Thief with a switch to choose between the two.

© RustyBolt.Info/wordpress
CyberChimps