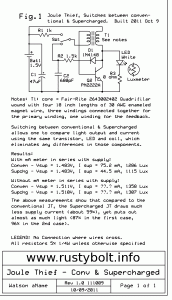
 Clarification: People have asked if the three windings explained in the schematic are in series or parallel. The three are in parallel, in other words, solder three of them together on each end. But make sure you use an ohmmeter to find and separate the other (4th or feedback) winding from the three.
In Jan, 2009 I designed a circuit that removed the Schottky and capacitor from between the collector and LED and instead used it (or a regular 1N4148 diode) only to rectify and filter the coil output only for the transistor base bias. My reasoning was that the losses in the diode would be reduced – much less current through the diode – and more power would then go to the LED. I found out that when I used a 560 pF to 1000 pF capacitor for the filter cap, the circuit was much more efficient than when the capacitor was larger. I called this a Supercharged Joule Thief.
In October 2011 I added a switch to a JT to allow switching between conventional Joule Thief and Supercharged. I used a luxmeter to measure the actual light output of the LED. There was no measuring of the current through the LED, so there was no question of if or how the ammeter or voltmeter might influence the reading because of the pulses from the JT.
As I show in the schematic, the performance difference is significant between the two types. My Supercharged Joule Thief has much less power consumption for almost the same amount of light. In other words, it is much more efficient, greener and wastes less energy than a conventional JT.
The switch allows me to switch between the conventional Joule Thief and the Supercharged Joule Thief. Since the LED and most of the rest of the circuit is the same for both measurements, there is no difference in the measurements caused by a difference in the circuit or the LED’s light output. This “apples to apples” comparison is important: it narrows down the efficiency difference to the changed components and only the changed components.
I used a 1 ohm resistor in series with the LED to measure the LED current. I assumed the voltage across the LED was 3.3 volts. When I calculated the SJT efficiency, I sometimes came up with a figure above 90 percent, but typically it was in the high 80s. This compared to 40 to 60 percent for a conventional JT.
I have corresponded with others and some have insisted that using this resistor in series with the LED to measure the LED current is not accurate. The problem seems to be with the way that the digital voltmeter measures the rectified pulses. I decided that the way to end this controversy is to measure the LED light output. I bought an inexpensive luxmeter for about $40 (USD). I glued the LED to a hole in the end of a small cardboard box which holds the LED a fixed distance from the luxmeter sensor, and blocks all ambient light. The LED is a white 10mm that can handle a watt for a short period – long enough to make a lux measurement.
My Supercharged JT was published on my late, great watsonseblog since 2009. I sometimes wonder if anyone considered adopting it to replace the conventional JT. It is well worth the very few changes and parts needed and almost no difference in cost.
If my SJT is compared to a conventional JT with a Schottky diode and filter capacitor on the output, I can’t see how the Schottky/filter capacitor JT could come close to the efficiency of the SJT, because of the losses in the voltage drop across the Schottky diode.
Previously in my blog I measured the efficiency of a conventional JT and my SJT. I used the supply voltage times the supply current to get input power. I measured the voltage across a 1 ohm current sense resistor in series with the LED. I multiplied this current times 3.3V for the LED forward voltage to get the output power. Then I divided the output power by the input power to get the efficiency.
I have to go by my memory (my blog is now gone). I was getting around 50% to 55% efficiency for a conventional JT, and my SJT was getting 80% to 90% efficiency. The difference was very significant. But some, including myself, doubted the measurements, so that’s why I bought the luxmeter – I could make a comparison of the actual light output. And as I showed above, this agrees with the earlier efficiency measurements I made.
Back to experimenting…


