default

2012-11-22 Hard Disk Drive As Grinder

Quantsuff sent me a picture of someone using a hard disk drive platter to grind down what looks like a circuit board (from this website).  That disk is spinning around at 120 times a second, so it should be able to do some serious damage to anything that touches it.

I spent several hours at work this week between jobs doing something similar.  We had a box full of old hard drives, 10GB and smaller, some as small as 3GB.  They’re from the previous century, when windows and programs weren’t so much of a hog with memory and hard disk space.  They were in administrative PCs, which had records of students, etc.  Back then, more than a decade ago, they made a really stupid decision to change the student identification number from a student number to social security number.  Then several years later, identity theft became rampant and the social security number had to be changed back to a student number.  We had hard disks that had personal records of both students and staff, so I began disassembling them so the data could not be accessed.

I got dozens of high power neodymium magnets and motors, platters, etc., and a big handful of torx screws.  And I still have more than a dozen more I have to do.

I never thought about leaving the motor and platters, and applying power to get the platters to turn.  Like, if the heads are gone, what can you do with some spinning aluminum disks?  Polish your pinkies?  I have several Joule Thiefs that I have connected to a hard disk motor, and when I spin the spindle, it lights up the LEDwith a real bright flash.  Trouble is my fingers quickly get chafed from spinning the hard metal spindle, so that doesn’t last very long.

Back to experimenting…

default

2012-11-21 Nixie Tube Driver Powered By Single AA Cell

I got an email from amzfx<at>email.com with a link to this picture.  I thought it was cool enough to blog.  I figured that most Nixie tubes are driven by high voltage transistors such as the MPSA42, which are only a few cents apiece.  In this case, it looks like the tube is driven by ten optoisolators.  I didn’t think that most optoisolators were able to handle 150 volts.  Maybe these are optoisolated SCRs?  Nah, SCRs don’t work on straight DC.  The opto’s are superior to the high voltage transistors because they isolate the Nixie’s high voltage from the rest of the circuit.  But it’s hard to justify using them since they cost a lot more than high voltage transistors and the transistors do the job okay.

Another thing I hadn’t thought about is that since Nixie tubes don’t have filaments, they don’t take much power.  In this case, it looks like the AAA cell is powering a single transistor DC-DC converter in the lower left, which supplies the high voltage.  Since only a single digit is on at a time, I would guesstimate that the high voltage has to supply a current that is much less than 1 milliamp, or much less than 100 milliwatts from the battery.  The controller doesn’t take much power, so the whole thing is really not a strain on the single AAA cell.

However, I will say that it’s impossible to beat the LCD displays for efficiency.  I bought an indoor/outdoor thermometer with a LCD display from Ratio Snack over ten years ago and it’s still displaying the temperature 24/7 on the same AAA battery I installed the day I bought it.

default

2012-11-20 1.5V Joule Thief 2.0

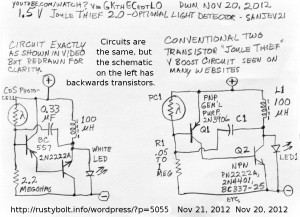
I saw this Youtube video of a schematic of a two transistor “Joule Thief” by Sanjev21 (update Nov 27 – I notice that this video has been removed – see note at end).  This circuit is very similar to the one that I have already blogged.

The problem that I see with the original, and also with this one (see the left schematic in the attached photo) is that the collectors and emitters of both of the transistors are swapped.  The collector of a NPN transistor (2N2222A) should always be more positive than the emitter; here it is more negative.  Likewise, the collector of a PNP transistor (BC557) should always be more negative than the emitter; here it is more positive.  In both cases the backwards transistor normally does not work and the circuit is non-functional.

In the schematic on the right, I show a typical two transistor “Joule Thief” that cane be found on many websites.  The transistors are connected to the correct polarities and the circuit will work, and light the LED.  The circuit on the left, which is the one seen in the video, is incorrect and will not work.

Note- I was not the only viewer who noticed the mistake he made.  Perhaps he decided that others were correct – there was a mistake in his schematic – and removed the video.

default

2012-11-19 Joule Thief with 120 VAC Light Bulb -Part 4

I built the “Joule Thief” circuit in this Youtube video by Xee2 / Xee2vids.  This uses a Radio Shack Cat # 273-1365 transformer, an E13007 transistor and a 51 ohm resistor.  He also puts a 200uF capacitor across the resistor and a 14 millihenry choke in series with the resistor.  The 120VAC primary is turned around and becomes the secondary, driving a 120VAC LED light bulb.

I used the same transformer, a 47 ohm wirewound resistor, a 220 uF capacitor and the same 40 turn inductor using the same toroid no longer available from Goldmine Elec.  I used a 2N3055 transistor, mainly because I could see no reason why the E13007 would be better than the 2N3055.  The voltages on the transistor are very low, less than 12V.  The E13007 is made for much higher voltages, the 2N3055 can handle 60 volts; both far exceed the voltages in the circuit.  The average experimenter is not going to be able to find the E13007 as easily as the 2N3055.

The LED light I used was the Lights Of America 2325LEDE12-LF4 2 watt, 110 lumen,  27 LED candelabra base light.  It lights up nice and bright in the circuit.

I varied the supply voltage from 1.5 to 5 volts.  The supply current changed from about 450 to 600 mA from 1.5 to 2.25V.  Above 2.25V to 5V it changed only slightly above 600 milliamps, uncharacteristic of a typical JT, which would vary from low to high.

I shorted out the choke and the light brightness didn’t change, but the supply current went down a few tens of milliamps.  From that I came to the conclusion that the choke really was not necessary..

default

2012-11-18 Wien Bridge Oscillator & HP 200C

QS sent me a link to a Youtube video of a young lady who explained the use of a light bulb in a Wien Bridge Oscillator and who mentioned that HP long ago used a light bulb in its audio generator.

The HP 200CD audio oscillator was a part of the workbench of a guy I worked for.  I could not figure out why they used a large dual ganged variable capacitor for the frequency dial.  Sure, it didn’t have the wear problems that a potentiometer has, but HP could have used a custom made pot that had multiple wipers and whatever else it would take to make it hold up under heavy use.  And I bet it would have still cost less than the variable cap.  Nowadays, an air variable capacitor can cost fifty or more dollars U.S.

Later I bought a Heathkit audio generator that used a light bulb and used switches to control the frequency.  This was all solid state (transistors) and was a nice piece of test gear.   The HP 200CD used vacuum tubes,  but even though it got quite warm, and was power hungry, it still was very stable.

I have built a few of the WBO circuits using transistors and a light bulb,  They worked very well, a lot better than the PSOs (phase shift oscillators).  The light bulb is low resistance, under 800 ohms (28 volts divided by 35 mA), so the output stage that also drives the light bulb has to be able to drive a few hundred ohms – the light, and any load on the output.   One issue with the light bulb is that at the lower audio frequencies, 100 Hz and below, the light may have too fast a response and cause the oscillator to gallop or waver.  The light’s response is getting close to the low frequency.


default

2012-11-17 Philips LED Light Bulb Reviews

CFL light bulbs have their disadvantages (see note below).   Now that the LED light bulbs are becoming more available and cheaper, there is an alternative to the CFL problem.  Yes, the LED lights are more expensive, but they save he buyer a lot in the long run.  I watched this Youtube video by a guy who bought one of the Philips Ambient LED light bulbs.   I agree with him 100 percent.  I have bought several Philips LED light bulbs and they all work like they are supposed to work, with excellent results.

There has been a large percentage of the white LEDs that do not live up to the claims that they “last for 100 thousand hours”.  I have done lifetime tests on the white LEDs I have purchased and I’ve found most of them die an early death.  The Federal Trade Commission has taken a maker of LED light bulbs to court for falsely advertising the performance and lifetimes of their LED lights.   I have been very concerned about the lifetime of these new LED light bulbs.  I have had a Philips 2.5 watt candelabra light running 24/7 for the almost two years and it has lost some of its brightness but is still very bright.  This has given me confidence in Philips LED light bulbs so that I will recommend them to anyone who wants to save a lot on their electric bill.
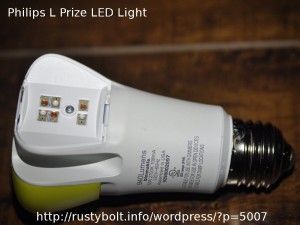
When the above video finished, I was given a choice to watch this Youtube video of the new Philips “L Prize” LED light bulb.  This is the one that I bought for $24.99 at Home Depot a few weeks ago.  I do not agree – now that their price has come down – with his claim that the earlier bulbs are a more cost effective purchase.  In either case, older or newer, they will save much more than their cost over their lifetime, and therefore are much more than worth the cost.  Recently I saw they were selling for $33 on Amazon.  If you’re lucky you might be able to find them at the Big Box stores for cheaper.

I really liked his demo of the LEDs inside.  I was surprised that there are red LEDs inside.  He also used a term that I haven’t heard before: remote phosphor technology.  Most white LEDs have the phosphor inside, but this one uses phosphor that it outside of the LED itself.  One other point he forgot to mention.  The L Prize required that the LED light be made in America.  The other Philips lights that I have are made in China, so if you’re an American, do your country a favor and choose them over the foreign made ones.

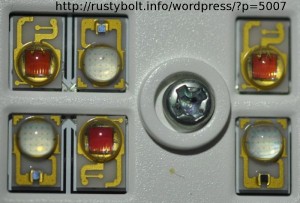
Update Nov 18 – I went to the big box store again to buy some more Philips L Prize lights.  They still had a bunch, but they were still hidden way back in the back of the electrical dept.  How do they think they are going to sell them if they are difficult to find?  Not only were they still on sale, but they were now marked down to $20, so I bought a bunch more.  I gave one to my friend, and hopefully it will work well with his new lighting system.  I may go back and buy some more.  I’ve included some pictures of the LEDs inside.  I got the yellow plastic cover off by prying on the flat end closest to the scew base (it’s thin plastic so one has to be gentle).  As the video showed, each of the three ‘lobes’ has three blue LEDs and three red LEDs.  I can see the wires in the red LEDs, but I can’t see any wires inside the blue.  Weird, huh?.  I put the yellow cover over a 5mm blue LED and it changed the blue light into white light, like magic.  Really quite a simple solution: put the phosphor outside of the LED.

I put the LED light, minus the yellow cover, into a light socket and turned it on.  The light is a very bright purple or violet light, due to the combination of the blue and red LEDs emitting simultaneously.  If you want a crazily bright violet light, get one of these and remove one (or more if you dare) of the yellow covers, and turn it on.  It’s hard to believe that those very bright red and blue LEDs are magically transformed into white light by some thin pieces of plastic.

I thought that I will probably be told I was nuts for spending a couple hundred dollars on light bulbs.  But the savings will start to accrue immediately.  The first few months I might save five bucks, so after two years I’ll have saved a hundred dollars.  Maybe four years later I’ll have paid for them, and any further savings will be money in my pocket.  But the environmental savings will also be immediate.  No more incandescents or CFLs to fail.

One person at work told me that their cathedral ceiling was so high they couldn’t change the light bulbs when they burned out.  Well , now they can get a tall ladder or someone to replace the lights up there with these LED lights one time, and they won’t have to change them for decades.  Really!  A few years ago I read some of Don Klipstein’s LED web pages, where he was looking forward to when LEDs were as efficient as CFLs and were not too expensive.  Now it looks like that time has finally arrived.

Update Nov 19 – I bought a bunch more, and some socket extenders.  I figure that if I put the LED lights into the recessed fixtures, they may get too hot.  So if I extend the light out so that it has more air flow, it will stay cooler.  And also more light will spread out across the room.

Notes

Note – I have told my co-workers that they should get rid of the old incandescent light bulbs and replace them with CFLs, but they have complained that the CFLs don’t last very long before they burn out.  I think  the biggest factor in causing them to burn out is they are used with the globe or ‘spiral’ pointing down, so the heat rises and the circuit in the base overheats, shortening its life. Another reason is that they get the very cheap ones from bargain stores, and these are lower quality than the brand name ones.  But where I live, Southern Calif. Edison gives a discount rebate to the seller, so the buyer pays a lot less for these.   One has to remember that a typical incandescent light lasts only a little over a thousand hours, so even if the CFL burns out, it still saves the buyer a lot of money on his electric bill.

Another important point about LED lights.  The technology is new and the prices have not yet come down to near that of CFLs.  People are very hesitant to spend what they think is too  much money on what they see is “just another light bulb.”  But they do not see the potential savings in their future electric bills the LED lights will give.  This saving more than compensates for the higher cost – the consumer should not be hesitant to buy the LED lights because the sooner they buy them, the sooner they will start saving.

The consumers don’t want to spend a lot on a light bulb (or should I say, don’t want to spend a lot more than they have been spending on a light bulb).  The LED light makers know this so they make sacrifices in quality and construction to make the lights cheaper, and the consumer gets an inferior product at the cost he desires.   But then there may be sacrifices in the lifetime and quality of the light from the LED light.  I saw this same thing happening when the white LEDs first came out: they had a bluish ring in the light pattern – something we don’t see today.  I had numerous experiences with LEDs that were low quality and/or short lifetimes.  I have not seen this low quality with Philips products that use LEDs.  As a consumer these LED lights meet or exceed my expectations for quality and lifetime.

default

2012-11-16 Hard Disk Head Pic

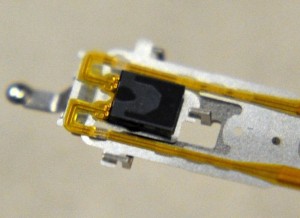
I’m messing around with some cheap macro lens adapters for my Nikon DSLR.  The pic is the hard drive head from a 20 GB Maxtor HDD.  I don’t see any dividing line between the two ‘poles’ of the magnet or whatever it is in the head.  I know that the heads use magnetoresistive technology but if it’s magneto- anything, it should have poles, right?  Anyway the pic came out reasonably well, considering the adapters cost only $13.00 plus shipping.  I put a +10 and a +4 together to get up really close, then I cropped the photo a lot.

default

2012-11-15 SD Card To USB Adapter Doesn’t Work

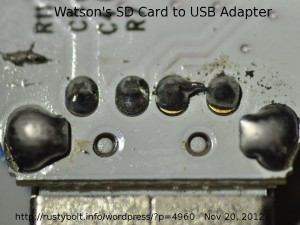
I have a few SD card to USB adapters that I got from Office Depot for 9 or ten dollars.  They seemed to work, but then one failed, then another.  later, a third failed, so I pulled the case off to see what was going on.  I was kind of surprised; the assembly was lower quality than what I would have expected.

As can be seen in the closeup photo, the metal USB connector is at the bottom, and above it are the four pins from the four contacts inside of the USB connector.  The PC board has some dirt and solder around the fourth pin, and a big blob of solder is stuck to the board right under the “R11”.  The third pin has a blob of solder extending from it, and nearly touching the fourth pin.  A little closer and it would have shorted the two pins.  The other side of the board has similar problems: solder blobs and dirt stuck to the board with solder flux. These were splashed onto the board probably from someone doing the soldering too quickly.  Just really sloppy assembly.

default

2012-11-14 GE 24991 Universal Remote Control

Several years ago, maybe 2007 when I bought the Samsung TV, I bought a General Electric (actually JASCO) universal remote control.  I think it was about ten bucks back then.  I went through the setup procedure and found the right code to enter to get it to work.  I found that I had to get close to the TV to get it to function.  I looked at the IR LED and noticed that the chip inside seemed off center to thelens, so I took it back and got my money back.

A few weeks ago, I was in Big Lots and saw the GE 24991 remote control for five dollars so I bought one.  I again went through the procedure to find the right code to get it to work with the Samsung TV.  I had completely forgotten about the earlier experience with the GE remote.  This time it also seemed much less sensitive than the remote that came with the TV, but it wasn’t all that bad.

Then I was in another store recently and saw the GE remote again for five dollars, so I bought another one, figuring that it might be better than the first one.  Well, it too, was not very sensitive and had to be aimed carefully at the TV to function.

I got to thinking about this.  What are the chances of me buying three seemingly defective remotes over the extended period of time?  The probability of that happening is infinitesimally small.  So what could the problem be?  Maybe the code I chose was one that gave poor performance.  So I started going through all the iother codes in the instruction pamphlet one by one until I came across another code that worked.

BINGO!  This new code is a hundred times better than the one I had been using.  I can kick back and push the remote without really aiming it at the TV and it functions!  The TV is much more responsive to the remote commands.  And I now have two universal remotes that are nearly as good as the original remote (they don’t have all of the functions, but most of the ones we need).  So I’m much happier and wiser.  Next time I get a remote that is not doing very well, I’ll be sure to try the other codes and see if it helps.

Back to watching TV…


default

2012-11-13 Leaky Corroded Battery Ruins Holder

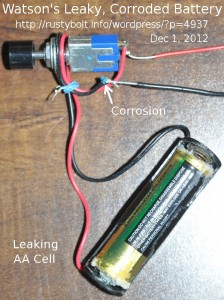
I forgot and left the AA cell in this circuit and I paid the price heavily.  The AA cell leaked and corroded the battery holder so bad it’s going to the trash can.  And by capillary action, the battery juice wicked up the black wire, around the switch and came out the end where the solder joint connected it to the other wire, right below the switch – you can see the blue-green corrosion in the photo.  Fortunately it didn’t get to the switch, which is an expensive and uncommon push on, push off type.  But the black wire is also ruined and I wouldn’t trust the red wire.

The AA cell says “may explode or leak and cause injury”  It should say “will leak and ruin equipment”.

This is another reason why I like using the small neodymium magnets for holding the wires to the AA cell.  If the battery electrolyte gets on them, it usually scrapes off easily and nothing is harmed.  Every plastic battery holder that gets corroded ends up with poor connections – the cheap rivets they used don’t make good contact, and the spring is usually so rusted that it can’t make good contact.  I tried repairing them way back when, but now I just dispose of them and get another one from Radio Shaft for a dollar or else buy a handful online when I’m ordering other parts.  I’ve been pretty lucky the last few years, because I’ve been diligent about removing the cells from the holders when they aren’t used, and getting rid of the old cells – they end up lighting several Joule Thiefs on a shelf.

© RustyBolt.Info/wordpress
CyberChimps