default

2012-07-10 Caught The Culprit

image

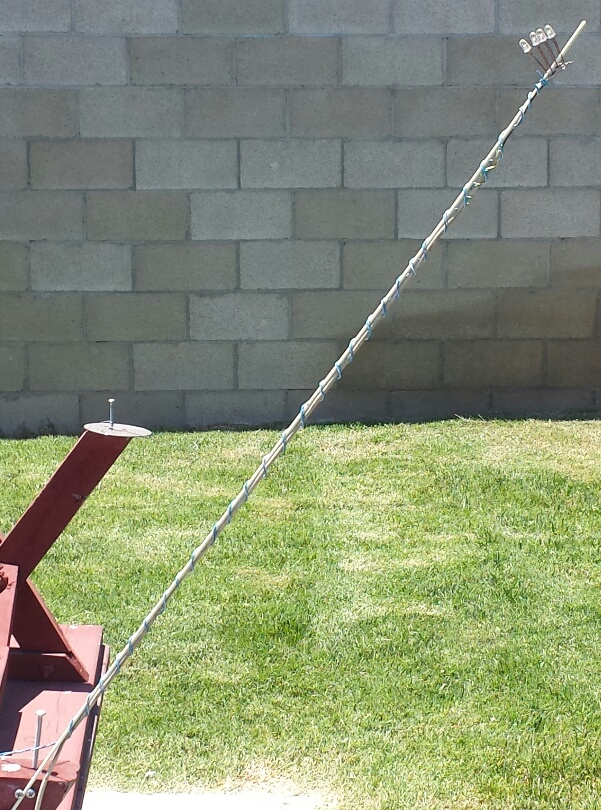
Late last year I put a piece of 12 AWG wire on the picnic table leg to hold up four LEDs that I use to convert sunlight to enough current to charge a 1 Farad capacitor and flash a LED.  For the last two or three weeks something (or someone) would come when I wasn’t watching and bend the wire over so it was no longer straight up.  When I would see this, I would go out and straighten it up.  Within a few hours or a day, whatever it was would come by and bend it over again when I wasn’t watching.  Sometimes I would see it straight, turn around to do something, and then a minute or two later it was bent!  I was getting extremely frustrated because it would happen suddenly and I didn’t see what happened.  I was beginning to think there was a ghost out there waiting until I wasn’t watching and it would bend it over.

This happened more than a dozen times, and finally I thought of a solution. I have a few meters of the Kevlar strength member that goes through the middle of a heavy underground fiber optic cable, and it is springy, just like the thin branch of a tree. It won’t bend, it will straighten back up and stay straight. I cut off about 30 inches of it and put it in place of the copper wire. For the last few days, the assembly has not bent, it has been straight and the LEDs have stayed pointing at the sky, like they’re supposed to.

Finally today I was looking out the window and a scrub jay flew over and landed on the springy whip, but it whipped up and down, and flipped back and forth, so the jay flew away and landed somewhere else. I finally caught the culprit! I had problems with bird poop on the bench, so I put screws in each leg and put a shiny platter from a hard disk on each leg (see the photo). These flop around if the bird tries to land on them. So my theory is that the jay couldn’t land on the other legs, so he got mad and decided to take revenge by landing on my wire and bending it over. But I got him back. Now every time he tries to land, he will get dizzy from bouncing up, down and around on the springy whip. I wonder what other way he will find to try to ruin my day?

default

2014-06-27 Very Tiny Microswitch

image

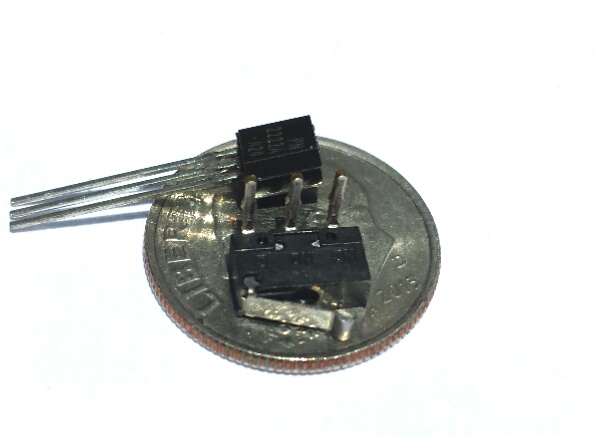
I bought a tray of 50 of these tiny microswitches from Goldmine-elec.com  for a very reasonable price of ten dollars U.S.  As can be seen,  both the switch and a transistor easily fit on a dime with room to spare.  These will enable me to make some auto shutoff Joule Thief lights that are much smaller than previous ones for a very reasonable price.

These tiny critters are really micro sized. The trick will be how to mount them so they don’t get damaged yet are still easy to actuate.

Typical prices for a momentary contact pushbutton switch are more than a dollar, and they are much larger in size.

default

2013-06-25 Paul’s Joule Thief

Paul has been busy creating little Joule Thief Jewels out of salvaged household items such as CFL ‘corkscrew’ light bulbs.  He has given me permission to post one here.

image

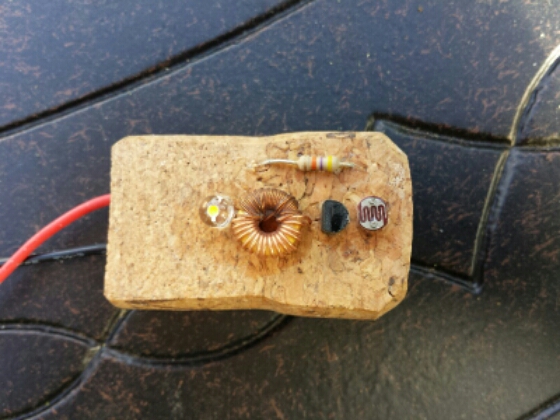
This is also a cork supported one. I used a reclaimed toroid with 15 turns of new enamelled wire for right winding and a reclaimed double length feedback left winding. The coil is fixed with nail lacquer. A high gain 670 hfe BC 337-40 transistor and a 47kΩ resistor makes it very light sensitive with the LDR. It still draws 20 mA but is bright and oscillates at 160 kHz. The solder joins are recessed in a carved out area in the cork top section covered by the residual sliver of cork as a base. The wires were positioned with hollow needles to guide them. It looks good with exposed bits but also light and retro. The cork supports and insulates very well. It is so light sensitive that it dims when near any reflective surface even clean glass as the reflection affects the LDR. That means it will not work well in a glass jar. The connectors are made of thin floppy silicone wires. Floppy wires work very well with magnets.
Overall fewer right turns seem fine and high gain transistors seem to be more useful than high power high current ones.

I really liked the look of this one for some reason – brings to mind Wynkin, Blynkin and Nod, maybe because looks like it could sail off on a voyage since it’s cork, blinking as it fades into the distance.  I thought I might be able to add a few ideas, so here goes.

 
We do not have fireflies here in So. California, so I thought it might be a good idea to try to make a substitute. My idea is to change the circuit to a Joule Thief flasher, and use a button cell for power. A small slot cut into the cork should serve as the battery holder.

Then waterproof the cork with coats of polyurethane sealer. The LED can be mounted at the end of a stiff wire so it is a few inches above the cork.

Several of these can be floated on the surface of a pond with running water. The motion of the water will cause them to move around the pond as they blink. The effect is to give little blinking lights hovering over the water at night. Since I really have no idea how fireflies act, I can’t say if this is a close substitute for them, but it should still give an interesting effect, as long as the cork stays afloat. The trick is to make sure it doesn’t get top heavy and capsize. But then it might be cool to have some blinkies under water, too.

Another idea. Leave the cork round so it will fit in the bottle. Mount the battery and LED on a length of stiff wire so they go inside the bottle and illuminate it. Use a bottle with colored glass for enhanced effect.

I was out for a walk and found a ball in the middle of the street, blown out there by the wind. The ball is made of clear plastic, and it’s hollow, and filled with what looks like water. In the water is this object that starts to blink brightly when the ball is bounced. I see kids wearing shoes with similar LEDs in the soles that blink whenever they step. Nowadays these can be found just about anywhere there is a toy or some item for the kids.

default

2014-06-22 Ferrite Core Crossreference

Here is a handy (but limited) cross reference of various core materials from various manufacturers.  The material type, such as 43 or 73, applies to types of cores other than toroids.  The Fair-rite 2673002402 uses 73 material and makes a very good choice for a Joule Thief core.  Another choice is the 2643002402, which uses 43 mix, but has lower permeability and takes more turns for the same inductance.

Ferrite Cross Reference

default

2014-06-19 How To Make A Toroid Core

A long time ago, probably 200 years, the scientists experimented with electromagnets by winding copper wire onto a bar or rod of steel. Most anyone that is taking a physics class has been introduced to this electromagnet. This works ok for a battery or direct current but when the current is alternating the solid steel piece has eddy currents that waste power and cause the coil to be lossy. In the late 1800’s they figured out how to reduce these losses by making the coil core out of many short lengths of wire bundled together. This works ok for audio frequencies but as the frequency goes up even these wires have more loss. So someone came up with the idea of making the coil core out of iron filings. This works even better at higher frequencies . As the frequency got higher the iron particles had to be made smaller to reduce losses. One way of doing this was to make iron precipitate out of a solution and you have very fine particles.

I decided to try make my own toroid core out of iron powder, but not with chemicals. One way to get iron powder is to go to the river or stream and run a magnet through the sand or soil. So I got a powerful neodymium magnet from a crashed hard disk and a pill bottle and walked down to the creek.

I spent about 45 minutes running the magnet through the dirt and pulling off the particles into the bottle. I ran the magnet through about a quarter square meter or two square feet each of soil down to about 2 centimeters or less than an inch deep. I collected about half a pill bottle or a few ounces of iron powder. When I got home I sifted the iron powder through a lemon-lime strainer and that left about half the powder and the rest were larger grains or pebbles. The powder sticks to the magnet so it is mostly iron.

When I finished sifting, I had 3 choices of what to do with the coarse grains. I could use them along with the fine powder in the mixture. Or I could leave them out altogether. Or I could crush them with a hammer and use the magnet to get the iron out of the crushed powder.

I chose this last option, and I’m glad I did. I went outside and found a smooth spot on the concrete walkway, sat down, and poured a small amount of the coarse grains into a pile and pounded it with a hammer until the coarse grains were broken up. I ran the magnet through the pile and put the iron powder into the container with the fine powder. When I finished, the leftover pile of nonmagnetic powder was three times as much as the magnetic powder. In other words, I got rid of 3/4 of the useless nonmagnetic stuff, and further concentrated the iron.

Okay, now I have to make a mold to hold the liquid powder until it solidifies. I chose a salad dressing bottle cap with a plug in the center that can hold the form for the hole. I put a short length of green soda straw on the plug, then I built up several layers of heat shrink tubing, a total of 5 layers.

I haven’t figured out what kind of binder to use. I was thinking that white glue might work, or maybe hot glue. Whatever I use it has to stay liquid long enough to mix the powder in before it solidifies. The hot glue may cool too quickly. The white glue might shrink as it dries, which may not hurt. I could pour more than one layer and then let it dry between layers. I need to check my glue supply to see if I have any two part epoxy. But I have to make sure that it will catalyze and get hard. If I have some, it has been sitting around for years and might be too old to get hard (I’ve had that happen before).

default

2014-06-16 More Stuff From Goldmine Elec

I succumbed to temptation and bought some more stuff from goldmine elec.com. I just couldn’t pass up some of the deals they had.

I got a whole 5000 reel of 1N5245B 15 volt zener diodes; they’ll probably last till the end of my life, unless I give them away. The whole reel cost only $7.00!

I got a bag of 2000 diodes, FDH400 type. They’re 150 volt, half amp. I saw a high voltage project where the builder put a whole bunch of 1 amp rectifiers in series to get several thousand volts. With 2000 of these, I could put scores in series to get a HV rectifier, and still have hundreds left over to play with. On a more practical note, they may work just fine for rectifying the 120 VAC for small AC line operated devices such as motion sensors, remote control receivers, LED lights, etc. Two in series could handle 300 volts peak reverse voltage.

I got a reel of 500 2 to 6 pF trimmer capacitors. Probably tiny and hard to solder. They sIould be great for tuning FM microphones. I should build one up to get a feel for their capabilities.

I got several of the bargain bags of five TO-3 power transistors marked with house numbers. These are typically part numbers used internally, and cannot be cross referenced to an industry part number. But the ubiquitous 2N3055 is about the bottom end of the power transistor performance list, so if the house numbered transistors are silicon and are used in a similar circuit, they should work. Of course I’ll have to sort them out to NPNs and PNPs. Some may even be something else, such as voltage regulators. I haven’t received them yet, so I don’t know yet (I received them – see update below).

I got a few other miscellaneous things, too. I’m looking forward to getting the package early this week. I usually count the parts I buy, but there are so many I think it’ll take too much time. The parts on reels should be easy to count.

Update June 16 – I received the box this afternoon. I looked at the reels and saw that they’re dated 1999, so I guess they should be called new, old stock. They were stamped with an ACCEPTADO stamp, so my guess is that they were from a maquiladora or ‘sweat shop’ in Mexico.

The half dozen bargain bags of 5 transistors are very interesting. In addition to transistors, I received several 3-terminal regulators. There was a LM150K which is the same, but better military specs than the LM350K. Then I got several 7703403YA ‘transistors’, which I found out are the same as LM137K, a hi reliability mil spec adjustable 3-terminal negative regulator, again the same as, but better specs than the LM337K. The National Semi LM1xx linears were a lot more expensive than the LM3xx because they were the wider ‘military’ temperature range.

I did get some odd power transistors. One was a MJ900 PNP power Darlington , beta of 1000 minimum at 3 amps. Another was a MJ13081 NPN high voltage (Vce = 450V) probably for the horizontal output of a TV.

Some of the cases were marked MC7815K, which is simply a 15 volt, 3 terminal regulator. Some of the labels were illegible so I couldn’t tell what they were. I’ll have to check them with the ohmmeter to find out if they are NPN, PNP, and if they are a transistor or whatever.

One had dust on it, so it must’ve been removed from some equipment. Almost all of the leads were bent somewhat. All of the date codes were from the 1980s or earlier – they’ve been sitting around for decades. Also, I have to check to see if they are good; they could be out of spec or nonfunctional.

All except 1 bag had an IR TR01A transistor. This is a high power (90W) germanium transistor, meant for audio power amps like car radios. The replacement transistors for it now sell for more than 25 dollars (US) apiece; old germanium parts are becoming very rare nowadays. So I got a new old stock germanium power transistor for a dollar and a quarter, plus 4 other parts in these bargain bags. Such a deal! I think the bags were easily worth the $1.25 I paid.

I bought a couple dozen of the “real thing” 2N2222 metal cased transistors, five for $1.25 (a quarter apiece).  This is not much less than what the price is for new (actually new old stock) ones – the 2N2222 was superseded by the 2N2222A, so they are no longer made*. They were all labeled with the big M for Motorola.

The leads had all been bent so they would fit into a socket.  This leads me to believe that they are ‘culls’, transistors that have been tested and were rejected or not selected for some reason.  This may or may not be bad.  I measured the gain of all of them with a cheapo DMM, and they were within normal limits, from 300 down to 170, but most were in the mid 200s.  If the test was for high gain, above 300, then the remaining ones will probably not be ‘rejects’, they’re just not the highest gain ones, okay for most purposes.

I also bought a bunch of butt splices or connectors. These are the yellow ones with the silicone gel inside. The two wires to be spliced are cut even and the insulation is left on the wires. They are inserted into the two holes in the connector, and the yellow button is squeezed with a pliers. This forces a metal finger with a slot in the center down onto each of the wires. The slot cuts off the insulation and makes a gas tight contact with the wire. The silicone gell surrounds the splice so that water and corrosion are kept out of the splice. These are made for outdoor use, but can be used anywhere.

* No longer manufactured, but still it is possible that the semi company can label a currently made transistor as a 2N2222.  Believe it or not, there is a gray market for counterfeit transistors and semi’s in other countries.
More later.

Update Aug 19 – I got a bag of 100 blue LEDs in a milk white epoxy package, for $8.00. That’s only 8 cents apiece, cheap! I’ve been thinking about colored LEDs, and I’ve come to the conclusion that the colored LEDs I use don’t need to be in a clear case and the light doesn’t need to be concentrated in a beam. This is because almost all colored LEDs I use are for decoration, not for illumination. White LEDs, on the other hand, are used for illumination and should have a light beam.

These blue LEDs have a diffused light, which is good for decoration.

default

2014-06-01 Remote Control Keys Go Intermittent

Something like a year ago I just took a cheap universal remote control that I often use and opened it up and unsoldered the IR LED.  I soldered a few feet of speaker wire into its holes on the circuit board and then soldered the LED onto the other end of the wire.   I mounted the LED close to the TV and this allowed me to leave the remotes lying on the desktop without being pointed at the TV.

I’m constantly pressing the mute button to turn off the commercials or whatever.  Lately the mute button has taken 2, 3 or 4 presses to get the TV to mute. It has been getting progressively worse. Finally I’ve had enough and I took the remote apart to see what was going on. It’s the same thing that I’ve seen on other keypads on remotes,calculators, etc. The key presses a small button of carbon on to the circuit board and makes contact. But it’s getting a little worn, and the most unusual thing is there is a build up of a liquid. I can’t understand how this is possible because the keypad is a solid piece of flexible rubber so no liquid should be able to get through it. I cleaned the keypad and the circuit board with some alcohol and cotton swab. I reassembled the remote and tried it and it works much better, almost perfectly.

The mystery is how this oily liquid gets through the rubber pad. It might be going through the rubber, but it’s silicone or something similar and is thick. Perhaps the silicon itself has oil in it. As I said I’ve seen this happen on other keypads so it’s not something that’s uncommon. And it’s easy to fix if you can get the remote open without damaging the case beyond repair and clean the keypad. By the way, black electrical tape or duct tape works like magic at hiding the damage.

Update – It’s not even a week later and the intermittent problem has returned. I cleaned the contacts thoroughly and I have not spilled anything on the remote since I cleaned it. The only explanation I can think of is that the contacts or the silicone rubber are creating the oily problem.

default

2014-05-26 Peter’s Induction Heater

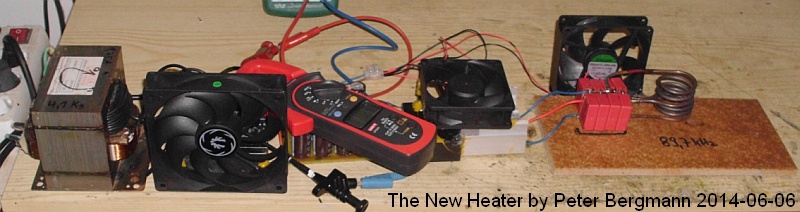
The new heater-SWow!  Red hot metal in just a few tens of seconds!  Peter has been experimenting with a MOT ( microwave oven transformer) with a rewound secondary that puts out 26 volts at up to 1000 watts.  He fed this into an 80v, 35 amp bridge rectifier and a bank of 4700 uF at 35 volt capacitors to filter the output the DC.

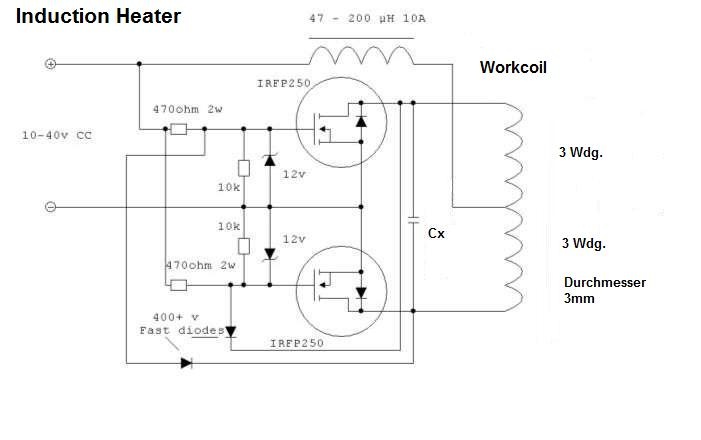
induction_heater_schemaThe circuit he used is similar to the one here.  The author called it a Royer oscillator, but I’ve never heard that term before. This is a simple circuit that anyone could build.  However the coil and capacitor bank make a tuned circuit that has to handle a large amount of power, which puts high stress on the heavy coil wire and especially the capacitors. That is why the author recommended using special types of capacitors, which are able to handle the stress and heat.

The circuit is dealing with hundreds of watts, at times close to 1kW. The full wave bridge rectifier and MOSFETs are mounted on heat sinks which are needed to keep them cool.They have a fan to increase the air flow and hence keep them cooler.  Bigger heat sinks are better.

WhiteHot-SThe sight of a crucible of metal melting is a sight to behold. You can cast your own toys or parts, or anneal parts or make alloys. But just having a simple circuit that makes heat by induction is really cool. And it’s relatively cheap and easy to build.

The MOT (microwave oven transformer) is free, salvaged from a non-working microwave oven.  The high voltage (CAUTION!) secondary has to be removed and a new secondary wound in its place with heavy wire.  This could be as few as 25 turns.  Peter said his puts out 26 volts.

The heat sinks may cost a bit, but a large sheet of 3/16 or 5mm thick aluminum can be used.  Heavy copper wire can be bought from the Big Box hardware stores.  Fans can be salvaged from an old PC but have to be cleaned and tested to see if they are in working shape.  The tank capacitors (big red ones connected to the coil) may cost quite a bit, and it’s best to get good quality ones and not cut corners.  The MOSFETs were IRFP250, and cost a few dollars apiece.  Any parts can be ordered from Mouser.com.  Some may be available at the local electronics store.  As with any project, the first thing that must be done is to acquire all of the parts.  Then you can begin the assembly.  There is no sense in spending a lot of time getting part way through a project to find that you are not able to obtain a component.

Some helpful information

I measured five inductors that I salvaged from PC SMPS power supplies. They all have yellow cores with the bottom painted white and they all have about 25 turns of heavy magnet wire. The size in mm is the outside diameter of the core. The turns count may be + or – a turn or 2.

20mm, 25 turns 30 uH

24mm, 25 turns 47 uH

27mm, 24 turns 56 uH

27mm, 24 turns 57 uH

The 27mm seem to be very common. These cores measured 10mm height. Later I measured some more and all of them were about 56 uH. Some had multiple windings of various thickness enameled wire. The windings of heavier wire with fewer turns measured about 9 uH.

default

2014-05-21 Laptop AC Adapters

A friend of mine has taken on the task of finding replacement AC adapters for two laptops, and I thought that I could repair the broken cord on one. But I tried to take the brick apart and damaged it beyond economical repair, so I resorted to the ‘Net to find replacements.  He gave me the model number on one of the power adapters but I found out that this was not the original adapter.  The original adapter had worn out and then been replaced so this replacement is now broken or worn out!  So I had to get the computer model number and search for those original power adapters.  This blog has my observations and my opinions and does not represent anyone else’s opinion.

Replacing a computer or any other AC adapter is a deep and dangerous pit for the average consumer to get stuck in.  If the wrong replacement adapter is used, you can damage the equipment or computer.  If the wrong polarity adapter is used it can severely damage the equipment or even cause a fire.

A lady at work had a fire in her son’s bedroom caused by a defective power adapter.  The fire men came and put out the fire, then left.  But the fire then ‘rekindled’  and caught the rest of the house on fire.  They lost almost everything. Let’s hope the home insurance is paid.

Another problem is that from my experience with Dell laptops, the BIOS checks for the adapter, and will complain about the AC adapter and then ask you to hit the F1 key to continue. This can be another inconvenience that the user may have to put up with if the adapter isn’t from the original maker.

Exact laptop replacement adapters can sometimes be found on eBay and Amazon but they may be used. Sometimes the seller damages the laptop beyond repair and decides to sell the adapter. But you take your chances because the adapter may be used and just a few months away from falling apart. I have purchased used items on eBay and on occasion had to return it because it was not working or damaged or not what the seller claimed it was.

Regarding new adapters, my observation is that most of the sellers have no clue as to the actual AC adaptor specifications. They just pass on what they find on some manufacturer’s list. It seems that the manufacturer has the idea that “one size fits all.”

“One size fits all” might be somewhat applicable to the voltage and current rating of the adapter. Most laptops take between 65 watts and 90 watts of power. Most laptops have 6 cells in the battery which adds up to about 19 volts. So a common output voltage and current is 19 volts at between 3 and 4 amps. But if the replacement is underrated or incorrectly rated the BIOS may complain or the adapter may overheat and die prematurely.

This “one size fits all” is an especially big problem with the adapter plug. There are dozens of different sized plugs, and sockets on the back or side of the laptops. A common size is 5.5 mm OD by 2.5 mm ID. But not only do the plugs vary by the different manufacturers, they also vary from one model to another of the same manufacturer, and even from different years of the same model. It’s a real nightmare trying to find the correct plug. To compound the problem, most sellers don’t say what the dimensions of the plug are. If the only thing you have to make a decision is the laptop model and/or the adapter model, then you tend to buy the least expensive adapter. You end up with the one that is most likely to not work at all, or work poorly and will fail later. The more knowledge you have about it, the more informed and better decision you can make.

Because of the high current, all power adapters that put out 3 or more amps should have a plug with a hole with two contacts that clasp the pin tightly.
Like this: (-o-) If the hole has a smooth metal surface without these pins then it may become intermittent as it wears out.

The AC line cord isn’t that much of a problem. Some adapters have a two prong cord and some have a 3 prong cord. The 3 prong cord maybe a little bit safer, but some houses don’t have the three prong outlet so it’s more convenient to use the two prong cord.

I found some 5.5mm OD, 1.5mm ID plugs at MCM Electronics for a little more than a dollar apiece, so I ordered some and expect them in a week or so. I can then use any 19 volt, 3.5 amp adapter and put the connector on the end.

The following URLs are meant to be temporary since they may be changed by the seller at any time.

*************************************************

#prontocharger.com

Every make or model seems to have the same boilerplate for description, etc.
Free Shipping on all orders

Acer plug should be 5.5 mm O.D. with a hole 1.5mm ID. 
Acer Aspire 5732Z series   price= $17
http://www.prontocharger.com/acer-aspire-5732z-series-laptop-power-ac-adapter-charger/

Tosh Satellite L355D-S7901  price= $17
http://www.prontocharger.com/toshiba-satellite-l355d-s7901-laptop-power-ac-adapter-charger/

**************************************************

Amazon

Many of the reviews AKA complaints were that the adapter overheated or burned out after a short time.  BAD STUFF!  Only 3.5 stars!  Apparently cheap price and cheaply made. 

**************************************************

eBay

default

2014-05-18 Kirk’s Electronics Projects

image

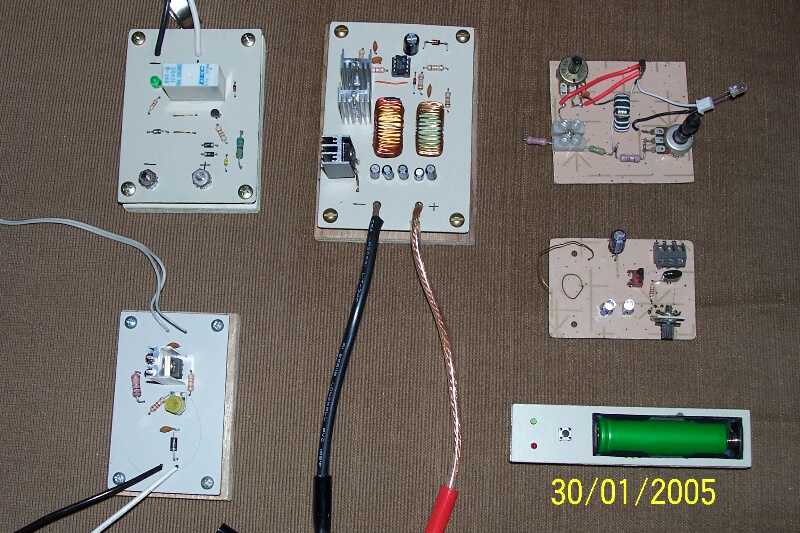
Kirk has given me permission to use his picture in this blog.  He builds them on Arborite, which is similar to Formica. It looks a lot nicer than the cheap plastic I’ve used. He says:

Bottom left is a float charger, top left is a cut out relay circuit, the middle is a battery desulfator, top right is Dr.Steven Jones reverse joule thief, middle right is lidmotor’s penny circuit and bottom right is a north pole detector.

He shows several projects that are interesting to me.  The North Pole Detector seems like would be fun to make, even though all I really need is a compass. I wonder what the big green thing is? I did a search for it and came up with a circuit that uses a Hall Effect sensor. These can be found in some disk drive pancake motors, if the rotor can be removed to get to the sensor. The rest of the circuit is a quad 324 opamp.

I bought a Power Pulse battery desulfator and put it and a power supply on a sealed lead-acid battery from an alarm system. I ran it for more than a year, probably more like 2 yrs, and I saw no difference in its inability to hold a charge. But the battery was probably more than 5 or 6 years old and ‘used up’. So it may have been too far gone. I’m not convinced that the thing works. It could be another “abs exerciser”. These are not allowed to be used at high power unless you’re licensed and trained, so the ones for home use are too weak to be effective. Same with a circuit that only is running on the battery a small part of the time. If it ran continuously, it would quickly run down the battery.

I looked for Reverse Joule Thief and came up with one of Davro’s circuits. Instead of connecting the LED from emitter to collector, he connects it from base to emitter, cathode to the base. When the voltage on the base goes negative, the LED lights up when it’s
-3V. There is no load on the collector, which allows the voltage to go higher. They say it will run down to less than 1/10 volt, but I’ve built it and I’ve found more like 1/4 or 1/3 volt.

Lidmotor’s Penny Joule Thief. I couldn’t find the exact one on YouTube. Some of his stuff might be posted to OverUnity.com forum, but I seldom log on to this and when I do my userid has expired so I got fed up with renewing every time, and don’t go there anymore.

© RustyBolt.Info/wordpress
CyberChimps