


 This is an old schematic that I drew in Apr of 2005 using SwitcherCAD III (now LTspice). It is taken from the board I built and put in service for several years as a LED test jig for testing the lifetimes of various white LEDs. Needless to say, most of the white LEDs lasted less than a year, some only a few months before they grew very dim. The only ones to hold up well were the Nichia LEDs.
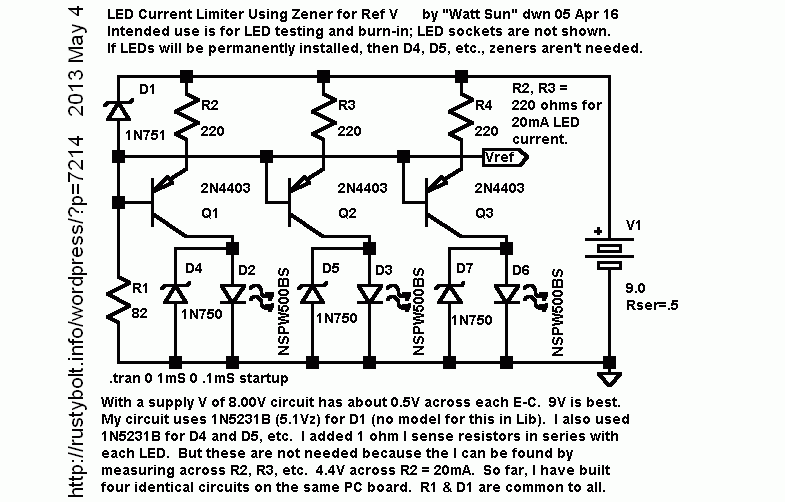
The circuit has some peculiarities. The zeners across the LEDs are there to protect the transistors from excessive base current. These zeners should be about 3.9 or 4.3 volts, low enough to conduct when the LED fails or has been removed, but high enough to not conduct when the LED is working.
Some of the parts get warm when the thing is left on all the time. It’s best if the supply is held at a constant 9V, to prevent those normally warm parts from overheating.
A Better Alternative
Nowadays, it’s much easier to make a constant current test jig like this. All you have to do is use a 5VDC regulated “wall wart” DC adapter such as the ones used to charge phones. Into it, plug the USB cable cut off from a bad keyboard. Strip off the jacket and shield and use the red and black wires. These should give you + and – 5VDC.
The typical white LED drops about 3.2 volts when there are 20 milliamps flowing through it (the actual voltage varies with temperature). Subtracting that from 5V leaves 1.8V to drop across the current limiting resistor. If you use a 100 ohm resistor, the current will be about 18 milliamps. If you want 20 milliamps, you need a 90 ohm resistor. You can put a 1k resistor across the 100 ohm resistor, and the result will be about 90 ohms, actually 90.909… ohms, which is just about 20 milliamps.
So for each LED you want to test, just add the LED (cathode or flat spot to the black or negative wire) and the resistor (or resistors) between the red wire and the remaining LED lead. A 1/2 amp adapter should be able to handle more than a dozen LEDs.
Here is the text that I wrote for this:
LED Light Output Degradation Over Time
by Watson A.Name 05 May 2 Ver. 050503B
[part of my LED light output degradation over time document -May 3, 05]I got some complaints that I should make some quantitative measurement of the LED light output. So I taped a cone of stiff heavyweight paper over the photocell of my old Weston Master light meter. I can now put the LED at the hole in the tip of the cone and it is held at a fixed distance of 70mm or 2.8″ from the meter, to give consistent readings. The cone also stops most of the ambient light from affecting the readings. And it seems there’s another benefit. The inside of the cone is white paper, so much of the light that comes from a wide angle LED is reflected back down to the photocell, giving a reading that is closer to the LED’s total output. If the cone wasn’t there, some of the light would fall outside of the meter’s photocell.
I’m getting a reading of about 65 to 70 for the cheapo Hong Kong white LEDs at 20mA, and almost 100 for the Nichia NSPW500BS white LED at 30mA. From my ongoing observations of another setup of a pair of each of the HK and Nichia LEDs all connected in series and now running for almost ten months at 20mA, the Nichias have held up well, keeping most of their brightness. But the HK leds have lost so much brightness that they are no good for illumination, and make barely acceptable indicator grade LEDs.
[Schematic description of current limiter circuit]
The circuit has two parts: a zener regulated voltage source and a single PNP transistor ‘current converter’ and resistor for each LED. The voltage source is a 5.1V 1/2W zener and 82 ohm resistor. The Zener cathode is connected to positive, and the anode to the 82 ohm resistor. The other lead of the resistor is to ground. THis combination gives a 5.1V source subtracted from the positive supply.Each of the transistor bases is connected to the 5.1V source. The emitter of each transistor is connected to one lead of a 220 ohm resistor, and the other lead of the resistor is connected to the positive supply. The 4.4V or 5.1V minus .7V is across each 220 ohm resistor, giving 20mA thru the resistor, and this current minus a fraction of a milliamp is the collector current, which is connected to the anode of the LED, and the cathode is grounded.
I originally included a 1 ohm 1/4W resistor in the collector to monitor the current, but I don’t think it’s necessary because the current can be monitored across each of the 220 ohm resistors.
Some of the variation in current is caused by the 5% resistors which are closer to 2%, but much of the variation is caused by the variation in B-E voltage drop from transistor to transistor.


