 I’m not sure why I haven’t dome this before. Actually, I have, but just not with a remote control. Perhaps it’s because I wouldn’t want to damage the remote control. But this time I bought some cheap GE remotes on Amazon for six bucks apiece, so the loss if I damaged one would be minimal.
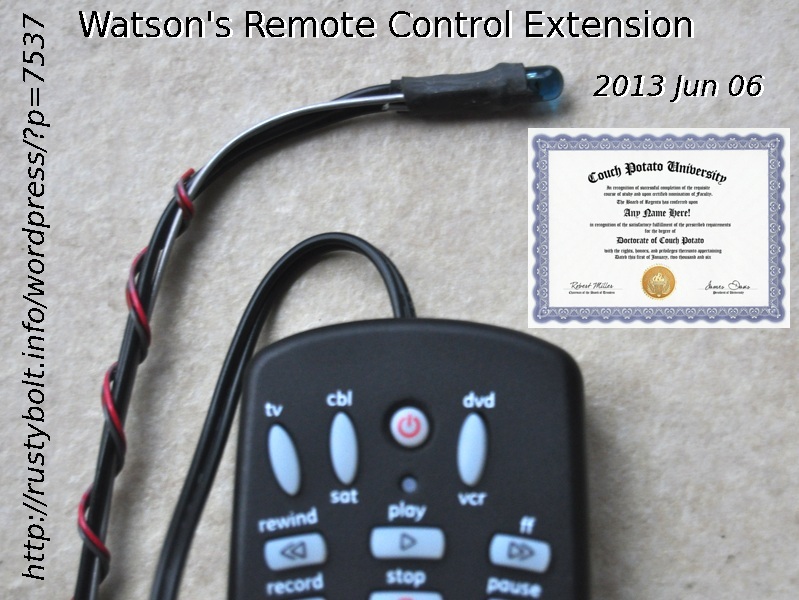
What I did was put a 16 inch (406 mm) extension on the IR LED of the remote control. That sounds sort of like an oximoron, doesn’t it? A remote control itself is an extension so why would I want to extend an extension? I had some back pain, but Vicodin took care of most of that (don’t worry – it’s a prescription). But when I grabbed the remote and held it over the top edge of my laptop screen, I felt a twinge of back pain, so I decided to do it. It worked really great. So great, in fact, that I awarded myself a Doctor of Couch Potato degree from Couch Potato University. Now I can go around to my friends and tell them that I’m a master at making your remote so easy to use that you’ll never go back to the conventional remote again.
What I Did
I popped open the remote with a small screwdriver. I had to get it started on one corner and force something else – I think it was a pen tip – into the slot, then move the screwdriver to a new spot. Finally the case popped open. I removed the PC board and unsoldered the IR LED, making a note of which way it went into the PC board.
I cut off a 16 inch length of 24 AWG zip cord from a speaker wire or wall wart, I forget which. I suppose it could be longer, but I haven’t tried anything longer yet. The zip cord has one conductor marked with a stripe, which I decided would be the negative or cathode lead. I stripped off the ends and soldered them into the holes on the board, making sure that the striped lead went into the hole where the cathode was.
I separated the leads of the other end enough to slip a 3/4 inch (20 mm) length of heat shrink tubing over them. I soldered the striped lead to the cathode or lead with a flat spot. I shrunk the tubing over it, then did the other lead the same way. Nice job, looked really pro. I reassembled the control, and tried it out. Oh, yeah, I had to reprogram it because the batteries had been removed. I tried it out on the TV and it worked great. Now I had to think about how I wanted to mount the LED.
I cut off a 16 inch length of stiff steel wire, I think it was 19 gauge. It’s easy to bend, but holds its shape well, so I can point the IR LED at the TV and it will stay pointed there. I bent a “hairpin” loop about 3/4 inch (20 mm) long on one end. I cut off about the same length of heat shrink tubing, large enough to go over the IR LED. I shrunk it over the LED and hairpin loop as can be seen in the photo. One other thing I might do is put some hot glue or silicone seal into the hole where the wire comes out of the control. This will help take the strain off the wires and PC board if somehow the wires get pulled.
On the other end of the steel wire I bent a loop. I then clipped the loop to the thin desk edge with a binder clip. It holds it tight so it doesn’t fall. I bent the steel wire so that the IR LED was aimed right at the TV’s IR sensor. Now all I have to do is push the remote buttons while it’s lying on the desk, Man, I sure am a couch potato, but.,, No pain, no strain!
One has to use one’s imagination here a bit and come up with a method that does the job, doesn’t damage the furniture and is esthetically acceptable. For my other LED lights, I’ve fastened the stiff wire to a spring clamp with wire ties or a screw-on hose clamp. Even electrical or other tape will work in a pinch – no pun intended. I’ve also used small C clamps to anchor the stiff wire to the furniture. On one lamp I made I used a five pound barbell weight I picked up at a yard sale. I drilled a hole in it and tapped the hole, then screwed a decent sized screw and washer into it to hold the stiff wire firmly.
In this remote control case, the IR LED is so small that it could be extended further and taped to the furniture so that it’s pointed in the general direction of the TV, and it should work. Or how about this? Just tape it to the brim if a baseball cap, and wherever you’re at, it will be pointed at the TV as long as you’re watching it. Cool, huh? What’s that silly wire hanging from your baseball cap? It’s my IR remote control, silly! Heh-heh..
Back to taking pain pills…
Update Jun 10 – I took a second GE remote control apart and unsoldered the IR LED. I soldered in a 6 inch (15 cm) length of stranded twisted pair wire, long enough to be flexible and have a RCA jack on its end. I installed that RCA jack, which allows me to connect an extension cable of any arbitrary length, or no length at all. I then reassembled the remote control, with the short cable hanging out of the hole where the LED had been.
I soldered the LED onto another short length of the same twisted pair, and soldered the other end of the twisted pair into an RCA plug to match the jack, making sure that the polarities match. Now I can plug the IR LED into the jack and use it similar to the first one, with an extension length of about a foot. Or I can separate the plug and jack and insert any length of cable with a RCA plug and a RCA jack on the ends. I can move the IR LED many feet or meters from the remote control itself. I will have to try using this setup in various places away from the TV.