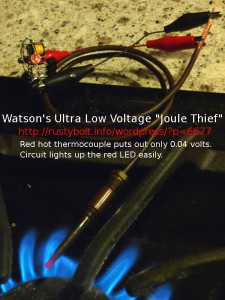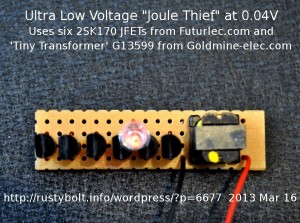
I’ve been interested in very low voltage converters for quite a while. I blogged this document several years ago in my late great watsonseblog. Almost a month ago I was commenting on a circuit, often called a Joule Thief, that was powered at 27 millivolts by a Peltier junction and the heat from a guy’s body. They said that the 2SK170 JFET was the best choice for the circuit. I had ordered the G13599 tiny transformers from Goldmine-elec.com and I wanted to try them with some of these 2SK170 JFETs to see if the circuit’s LED would still be putting out light at the 40 millivolts that my thermocouple put out when it was hot. I ordered the 2SK170 JFETs from Futurlec and I’ve been waiting for a month for them to arrive. Finally today they came in the mail. They were all on tape, cut into lengths of ten JFETs each. Each JFET was marked “K170 BL 1C”, which means that they were 2SK170, with the Idss range BL, which is the middle range of 6 to 12 milliamps. I don’t know what 1C means, might be the manufacturer code.
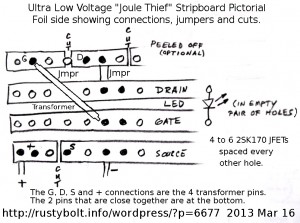
In the original Youtube video the circuit used four of the JFETs in parallel to get increased current. So I soldered four of them to some wire leads to connect all sources, gates and drains respectively together in parallel. Goldmine shipped a paper with the pinout of the transformer along with the parts. I connected the low resistance winding to the drains and supply positive. I connected the high resistance winding to the gates and supply negative. I connected the LED between the gate and drain, with the cathode (flat spot) to the gate. There is no resistor in my circuit because there is no current flow into the gates, so they don’t need a resistor to limit the current. I added the 470 uF capacitor across the supply leads; it’s optional but I highly recommend that it be used.
The first time I tried it I found that the high resistance winding was connected backwards and the LED would not light. I reconnected the winding correctly and the LED lit brightly at a half volt. I kept reducing the voltage and it was still glowing at well below the 40 millivolts I was hoping for. Success! I’m getting the same performance as the original circuit in the video. All I need to do is put another 10 or more of them (a lot more?) in parallel to get the increased current. But then I should try to get this circuit to generate enough voltage to drive a power MOSFET and let it do the heavy lifting.
I still have to do a good closeup of the circuit. Some call this a Joule Thief, but it bears very little resemblance to the original JT.

Update Mar 16 – I connected it up to a peltier junction. The palm rest area on my laptop next to the mouse pad is warm, so I put the peltier on there with a piece of aluminum as a heatsink and radiator. Now the LED glows from the warmth of the laptop. The voltage measured 34.2 millivolts. I have to find a larger piece of aluminum to take away more of the heat, and make the LED brighter. I’m building a neater version on a piece of stripboard (see photos).
Veracity of photos – These are the actual photographs of the circuit running from very low voltage sources: less than 0.1 volt, typically below 50 millivolts. The photos have not been “tricked out” with Photoshop or any software to disguise any external power sources. They are the real thing.

I’m starting on a third one. I did some measurements and noticed some odd behavior. The current increases as the voltage increases, up to 0.95V, then as the voltage increases, the current decreases, which is the opposite of a normal Joule Thief. The current reaches a maximum then will not go higher, which is typical of JFETs, since they are constant current when the gate is at zero volts. Also, the frequency is about 8kHz at the 40 millivolt point, and steadily decreases as the voltage rises, down to 240 Hz when the voltage is at 1.5V.
I added a ZTX1048A – I connected the emitter to the sources, the collector to the drains. and the base through a 1k resistor to the gates. I saw a definite increase in brightness when I connected the base, but I’m using the one with four JFETs in parallel. I noticed two things. The added ZTX1048A does not reduce the lowest point where the LED goes out. It’s still about 35 millivolts. And it doesn’t change the plateau that is reached when the voltage is increased. Perhaps if I remove three of the four JFETs and use only a single one with the transistor, it might do better.
But I think I should not be trying to increase the JFETs’ output. Instead, I should use the circuit as-is, as the bootstrapper, to get the voltage to start a power MOSFET up, and then let it take over. Once the MOSFET gets going, there is no limit to the amount of power it can boost from a very low voltage. I have some IRLZ34s with about 30 milliohms internal res. That would allow about 1 amp from a 40 millivolt thermocouple. But it takes a bit of AC current to drive the gate, and that’s where things are a problem. Maybe use the JFETs to charge a 1000 uF capacitor, then get it start up the MOSFET which will bootstrap itself into running.
Or perhaps I should add a 2N7000 MOSFET to the circuit to see if it will help. It has only a few tens of pF gate capacitance compared to a thousand for the power MOSFETs and therefore is much easier to drive. Update Aug 2, 2013 – I’ve been experimenting with the 2N7000 to find out if I can get it to perform at very low voltage. Do a search of my blog for 2N7000 to see a circuit.
I just grabbed one of those transformers from Goldmine and man 3vdc in 200vac out.
“Tiny Inverter Transformer – Designed for tiny strobe lights this small inverter transformer converts 3VDC into 200VAC when used with a simple 2 transistor circuit. Size only .4″ square x .35″ H. Has 4 pins. Complete with schematic of a simple strobe using this transformer.
G13599”
Now, that can’t be right, can it? DC in to AC out unless it has something in it as well.
The transformer comes with a schematic of the circuit you must use to get the 3VDC switched to pulses of AC, which are then stepped up to 200VAC by the transformer.
Yep, I know electronics and 25 years ago used a 555 timer to pulse 5v to 750+ through a hand wound ferrite E Coilcraft E core so I knew they weren’t telling the true story since a transformer needs anything but DC.
I received my package today and haven’t played with that tiny transformer as of yet. What I did find out is they offer a beautiful already wound Toroid with 18:18 (so 1:1) and when I measured the ohms on each side it was .1 ohms. Worked smashingly well in my circuit and the wire is pretty thick (20 or 22ga I think) so the toroid must be a darn good one. The positive on it is that it has a base with the wires that are through hole.
Seems my frequency has dropped with the new toroid as I can hear it with a fresh battery pretty loudly and with about 1.2v I can hear it slightly.
I purchased a 20mhz scope off of Ebay and can tell a lot more of what is happening once it arrives.