I needed a bright light over my workbench to see my work better, and this project was born out of necessity.
The Electronics
I bought a Bivar high power white LED Mouser P/N 749-L2PGN1-F, which uses a Cree XP-G mounted on a star board along with a reflector. The cost was $10.10 US. I have a 5V 1 amp regulated AC adapter that I can use to supply the needed power. The LED will handle up to 1500 mA, but since I will not be using a heatsink, I decided to run it at 600 mA. I measured the 6 feet of Cat 5 stranded twisted pair that I salvaged from a patch cord, and it measured 0.32 ohms for both conductors. I connected the LED up to the power supply with this wire, I found that when I added 3 ohms in series, the LED drew 600 mA at 5V.
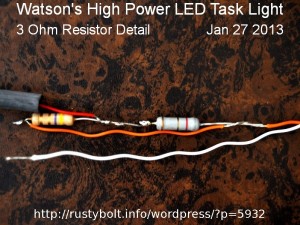
 I show a picture of the 4.7 ohm 1W and 8.2 ohm 1 or 2W resistors connected in parallel, with the black heat shrink tubing on the left ready to slide over the whole assembly after I get done. This has to dissipate about 1.2 watts, so it will get a bit warm, but the heat shrink should protect it from getting any other object warm. The solder joints outside of this assembly will also have their own heat shrink tubing. The 4.7 and 8.2 equal 3 ohms in parallel, but I would have used three 1 ohm, 1/2 watt resistors in series instead.
The Lamp and Mount
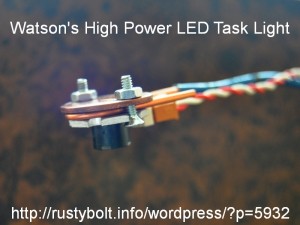
 The Bivar is mounted to a 2 foot length of 12 AWG solid insulated wire which acts as a gooseneck (see photo). A stiffer 10 AWG wire would have been better, but I used what I had at that moment. The other end of this wire is attached to a Pony spring clamp with two wire ties. I bent a loop in the wire to keep it from slipping in the wire ties. The clamp just holds onto the edge of a shelf I have on the bench. I tied the cat 5 wire to the 12 AWG gooseneck with some small wire ties. Once the cat5 wire leaves the bench, it connects with the two resistors and then goes to the AC adapter.
The AC adapter doesn’t have a shut off, so I bought a line switch (looks like a cube tap) at the 99 cent or dollar store and plugged the adapter into it, then into the power strip. This makes it convenient to shut off the light when it isn’t needed. It also saves a some power – AC adapters are ‘vampires’ that suck a small amount of electric power all the time when they’re plugged in, even if nothing is plugged into them.
The Bivar LED is directed downward where it puts out a lot of light near the work that I’m doing. The color rendition is very good so I have no problems reading the resistor color codes. It also is flicker free because it is powered by a DC power supply.
Back to experimenting…