Update: This circuit is much like the Supercharged JT, see the end.
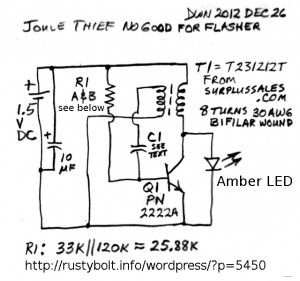
A while back I built a Joule Thief flasher, like the one I had seen somewhere on the web, most likely on Youtube. The schematic shows the different arrangement of the feedback winding and base bias resistor. Normally the feedback winding is in series with the 1k resistor to the positive supply. But in this arrangement, one lead of the feedback winding is connected to negative, and the other lead is connected to the timing capacitor. In my first build, I had used a 120k ohm resistor for the base bias from positive to the base, and a 33 uF ‘lytic for the timing capacitor, but the flashes were so fast that I had to put another 220 uF capacitor across the 33 uF. Even with this large capacitor, the flash rate was still too fast. And the flash was very weak, not really visible. The supply current was very low, only a milliamp or less.
So at this time, I decided that if I was going to use an even bigger timing capacitor, I would have to use a smaller timing resistor to give the transistor more base bias and help brighten the LED (I used an amber LED). I put a 33k resistor across the 120k, which was then effectively 25.8 k. The flash rate sped up, but the LED didn’t get much brighter. And at this time, I figured that if I lowered the timing resistor down to where the flash was much brighter, the timing capacitor would have to be a thousand microfarads or more. Nix to that! My Supercharged Joule Thief Flasher does a much better job with a capacitor of a few uF.
So now what should I do? I’ll change it back to a Joule Thief, but I will just leave it like it is, with the feedback winding to negative. So I removed the capacitor and put a 0.1 uF capacitor in its place. Well, of course the flash rate sped up so fast that the LED looked continuously on to my eye. But it was still too dim. The frequency was 4567 kHz.
I removed the 0.1 uF capacitor and put a .01 uF capacitor in its place. The LED was brighter and the narrow pulses were getting closer together, as I saw them on my ‘scope. With the scope on the collector, the waveform was a narrow low positive voltage spike, followed by a much more negative voltage spike. The frequency was 46 kHz, but there was still a lot of ‘dead time’ between spikes. I figured that if I decreased the timing capacitor even further, the spikes would get even closer together and less dead time would mean a brighter LED. So I replaced the .01 uF with a .001 uF or 1 nF. The LED became brighter and the spikes were closer together.
Well, I figured that the spikes needed to be a bit closer, so I changed the timing capacitor to a 330 pF. Now the LED was getting bright enough to see decently and the pulses were close together. The frequency was 172 kHz. Even so, the supply current was only 5 mA, which is less than a tenth of a normal Joule Thief.
Conclusion
Right now, I can say from this experience that this circuit the way it is, is not the optimum for a Joule Thief, and that it is definitely no good for a flasher, even though the circuit does flash dimly. I will try to increase the base bias current by reducing the value of the resistor below 33k in parallel with 120k.
I have changed R1 to a 5.6k resistor, which was the value that gave about 50 milliamps supply current. The amber LED brightened considerably. I put a 0.47 ohm resistor in series with the LED so I could measure the LED current. The LED current was maxed at 15.5 milliamps when I changed the capacitor to a variable capacitor and tuned it to 101 pF. So I replaced it with a 100 pF disk capacitor. The frequency was almost 300 kHz and the supply current at 1.5V was about 50 milliamps. That was very low for a current of 25.5 mA through the amber LED.
The amber LED was brightest when the variable capacitor was broadly tuned to a certain point. This is much like the Supercharged Joule Thief, where the capacitor interacts with the coil’s feedback winding to give higher efficiency than a conventional Joule Thief.
I removed the amber LED and replaced it with a white LED. This is so I can make an “apples to apples”comparison with the Supercharged JT. I further reduced the R1 to 3.9k, to increase the supply current up to the point where the Supercharged JT usually is. I was getting about 15 mA to the LED with a supply current of 48 mA. The frequency was 593kHz which is very high, at the bottom of the AM broadcast band. Some figures for calculating the efficiency:
3.3V * 0.015A = .0495 W or 49.5 milliwatts.
1.5V * .048A = .072W or 72 milliwatts.
49.5 / 72 = 68.75 percent.
So this circuit is on the very high end of efficiency of the conventional JT, but on the low end of the efficiency of the Supercharged JT. I will have to make another one or two of these to see if the circuit is consistent with the parts I used.
I’m building a second one, so read my blog about it here.
Back to experimenting…


https://www.youtube.com/watch?v=pZhbozELe2M
Thanks for the demonstration.