


I got some 1 watt LEDs from Goldmine Electronics for 5 for $10 (They were on sale when I bought them). These are LEDs that do not have a mounting bracket, but were made for surface mounting. I’m not sure if the case itself is supposed to be held to the PC board only by the two solder tabs, or if the case was also meant to be glued to the PC board. I decided that no matter, I was going to glue the case to the board with thermal adhesive.
So I searched online for thermal adhesive and found that the local Microcenter has two-part thermal adhesive made by Arctic Silver. I’ll use any excuse to stop by a computer store, so I went and and bought the adhesive for ten dollars US. It’s apparently epoxy with a large amount of thermally conductive alumina ceramic powder.
I needed something that is highly thermally conductive to use as the heat sink for the LED. I chose a short piece of 6 AWG very heavy solid copper ground wire I bought at the big box hardware store. I could have used a piece of thick aluminum or a piece of scrap PC board.
 This 6 AWG wire is heavy and round. How am I going to get the LED to fit? I decide to hammer it flat, with a right angle “foot” at the end for the LED. I used a ball peen hammer and a heavy piece of steel. It came out nicely. First I turned on a stove burner and held the end of the copper ground wire in the flame for a few minutes to anneal the copper to make it softer and easier to work. After flattening the end, I bent over the flat part so it all looked liked a leg with a foot. I filed the sole of the foot flat with a file so the LED would make good contact with the copper.
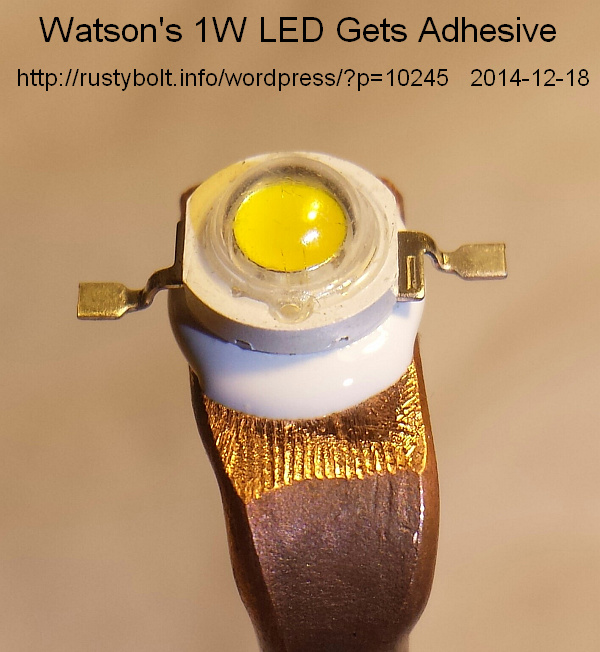
Mounted the foot with the sole up in a vise. I mixed even parts of the adhesive and put a small blob on the sole, and I seated the LED in the adhesive. A half hour later the adhesive was hard and the LED glued ‘permanently’ to the copper heat sink.
I added short lengths of copper wire to the LED’s mounting tabs and put them and the heavy copper wire inside of heat shrink tubing so the wires would pull on the heat shrink, not the tabs. in the photo, the cathode’s minus sign can be seen on its side, looking like a 1.
I connected the LED up to a power supply and turned up the constant current to 200 mA. To my surprise, the LED put out warm white light, just like an incandescent light bulb. Very nice! It took a long time for the heavy copper heat sink to get warm, but the 1 watt LED rated at 350 mA max was running at only 200 mA. It still had more than 100 mA to go.
In the past I have mounted 4 or more standard 5 mm white LEDs on a perf board and fastened them to various locations for task lighting. They do a good job, but it requires assembling the circuit board before it can be used, and other design decisions. With these 1 W white LEDs, it just requires a small metallic surface to act as a heat sink and some thermal adhesive for a few tens of minutes. Then some wiring and a 5VDC, 1/2 amp AC adapter and a resistor. The resistor calculates to 8 ohms at 1/2 watt. But some of this resistance might be in the thin wiring to the LED. Put these all together and it’s a very handy task light.
I have other surface mount LEDs that come in a case that is epoxy and are so delicate that it’s often damaged by hand soldering. With this thermal adhesive it may be possible to position the LED and wires, then glue everything in place before soldering. I will have to experiment with this later to find out. I can also glue LEDs to a length of angle aluminum and mount the strip under a cupboard, for example. The thermal adhesive makes it possible to get away from Star LEDs with the screw slots, and drilling holes in a flat piece of metal.


If you don’t mind purchasing from China, you can get large quantities of these for cheap! Like 100 ea for 5.50. I bought 200 of them not too long ago, (sure-display) and only paid a single shipping fee, 4.00.
I made a jig to make up a 4×4 panel. (4 series-ed beads then 4 strings linked in parallel) I added a 10 ohm resistor and it works great on 12 to 14 volts without getting too warm without a sink. I then proceeded to make 10 more panels, ostensibly for RV use. Then I got the idea to lash them all together and then high power pulse them with a variable square wave controller. It’s overkill no doubt as pulsing just one panel works quite well…
I forgot to mention sure-display is an Ebay seller. My pulser is just a 40 volt supply switched on and of with a darlington pair hooked to a function generator. Gives the ability to vary intensity and rep rate. Happy New Year!